Process CSV Streams into Codable Objects

Doing a lot with CSV lately. I had started building a CSV parser in Swift several years ago when actively using an Objective C framework that I kept finding bugs in. That framework used pointers to extract fields, which really made things difficult to debug.

One objective is to allow incremental processing, as happens with web streams: in the past, I handled millions of records and it was obviously important to start showing users results as soon as a few records were decoded.

As a semi-retired dev (not my choice!), I decided to upgrade the Swift code and “do it right”. The project is table driven and uses a state machine. Unit tests probe many of the edge cases (e.g., empty file, just one column thus no delimiters, spaces before or after fields, etc).

It has taken a lot longer than I thought, and the unit tests took longer to write and debug than the original source! [Anyone telling you after weeks of development to write some unit tests in day is totally disconnected from reality—this happened to be recently too!)

What I’ve been doing is modifying all my open source that deals with streams of data, and make them comply to Apple’s Streams interface (InputStream and OutputStream). It turns out that with a Steam interface, its pretty easy to make them work with Combine, as Operators (combination of a Publisher and a Subscriber). The reason for being an Operator is that they accept a Publisher’s raw data stream (as a Subscriber) then output something (as a Publisher). In the case of CSV, the code takes a CSV line and decodes it into a struct or class that compiles with a simple protocol, CSVDecode. In practice, an app using it will direct a stream of data (file or network), and get a stream of objects in return.

In addition, the code is packaged as a Swift Package, recently supported in Xcode 11. Packages are great!

What really helped me was to create a diagram of how CSV works. There’s actually a RFC describing it, along with common extensions, all of which this code supports. A new program on the Mac App Store, Diagrams, was a huge help! It’s an easy to use and not expensive: it took me about 5 minutes to master it. For instance, this is what I created to let me code the comment line section:

Screen Shot 2020-03-13 at 5.35.46 PM

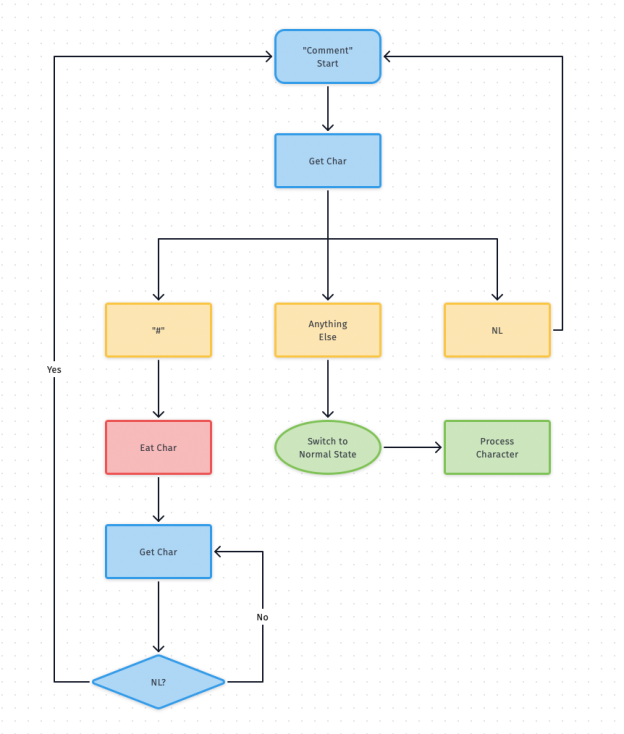
The overall state diagram took me a lot longer than I thought it would too! I kept finding edge cases.

Next, I’ll write a test app that lets people access a slew of CSV repositories on the web. If you want to see the source click this link SAX-CSV-Parser-Package.

Nice technique to specify log messages

Just changed jobs, and having to switch back to Objective C for most of my work. I’ve used a selectable macro in the past for log messages:

#if 0 // 0 == no debug, 1 == lots of messages
#define LOG(...) NSLog(__VA_ARGS__)
#else
#define LOG(...)
#endif

You can add this to each source file, and selectively turn messages on or off with one tiny change. But the problem is, you look in console and there are slews of log messages. So how to know which is from what file?

Well, I just found out I can change the above to:

#if 0 // 0 == no debug, 1 == lots of mesages
#define LOG(...) NSLog(@"DBManager: " __VA_ARGS__)
#else
#define LOG(...)
#endif

That is, since Objective C will coalesce strings, it will merge @”DBManager: ” into whatever format string you used.

I suppose the __FILE__ or NSStringFromClass([self class]) might work too – but I didn’t try.

How to Calibrate a New Monitor

The Apple ColorSync calibration screens are useless. I entered a bug over 8 years ago on it, and nothings changed.

My over-5yr-old Hanns-G 27.5″ model died (cost $400+) and I replaced it with a 27″ LQ 27MP57HT-P monitor (cost ~$125!). However, when I plugged it in to my Mac, it looked terrible!

After trying the Apple calibration, I re-discovered a web site that I now remember using to calibrate the old monitor: LCD Calibration

Using the sharpness test, I discovered that the LG essentially turns it off at a setting of 50, not 0 and not 100.

In the end, I found settings of:

Brightness: 70
Contrast: 71
Black Level: High
Super Resolution: Off
Color Levels: All at 50

Hope this helps someone someday. I found nothing googling around.

Incredibly small+compact+clever Swift code for descriptive Auto Layout constraints.

I book marked SwiftAutoLayout when I first saw it announced. This amazingly compact and innovative bit of code was written by a young Canadian student Indragie Karunaratne.

Currently, there are several popular DSLs for doing Auto Layout related work (mostly creating constraints), but they are all (IMHO) way to large and all encompassing. Indragie’s code is lightweight, clear, and does most of what you’d want. I often evaluate code I use with the question: “Can I maintain this if the original author abandons it?” Clearly this code falls into the “yes” category (for me and for most others too!)

This code hadn’t been updated since early this year, so I
forked it and addressed one feature request and added support for new constraint options available in iOS8.

Lets look at an example of creating two constraints:


let constraints: [NSLayoutConstraint] = [
contentView.al_centerX == rLabel.al_centerX,
detailLabel.al_baseline == rLabel.al_baseline
] // wrapped for easier viewing
contentView.addConstraints(constraints)

In this simple example, there are two equalities. More complex constraints might have a multiplier, constant, and priority, in which case they’d look like:


let constraint = view1.al_left == view2.al_right * 2 + 10 ~ 100

instead of the standard method:


let constraint = NSLayoutConstraint(item: view1,
attribute: NSLayoutAttribute.Left,
relatedBy: NSLayoutRelation.Equal,
toItem: view2,
attribute: NSLayoutAttribute.Right,
multiplier: 2.0,
constant: 10.0) // wrapped for easier viewing

constraint.priority = 100

Almost better is the wow factor you get when reading the code to understand how it works! By using extensions to UIView (the al_… attributes), these expressions get turned into ALLayoutItem structures, which you the user never see. They simply act as placeholders for values, so the expression can evaluate to a single NSLayoutConstraint!

It took me a few reads of the code to “get” it, then “Wow!”. In the end, you get an incredibly useful utility barely consuming 250 lines of code, and have the opportunity to see Swift used in a way you probably never even thought of.

[Lastly, I should add that Indragie contacted me, and has asked for a pull request so he can wrap this Swift 2.0 code into his original repository – something I will do shortly when iOS 9 goes GA.]

Amazing technique to embed non-optional assignments within a comma separated “if let” statement

The problem is, you have this complex set of assignments to complete before you can take an action, and most of them are optionals – but not all:


for cell in tableView.visibleCells {
  if let indexPath = tableView.indexPathForCell(cell) {
    let user = users[indexPath.row]
    if let ratingLabel = cell.contentView.viewWithTag(100) as? UILabel { 
      setRatingLabel(ratingLabel, user: user)
    }
  }
}

Now imagine more assignments, a few optionals then a non-optional – it regresses to the old “cascading if let” situation in pre-Swift 1.2 code.

This type of situation appears in my code all the time, so I

posted a question on the Apple internal Swift forum asking for suggestions.

Fortunately, it was answered by OOper! It seems that you can embed a non-optional assignment by prefix it with “case”:


for cell in tableView.visibleCells {
if let indexPath = tableView.indexPathForCell(cell),
   case let user = users[indexPath.row],
   let ratingLabel = cell.contentView.viewWithTag(100) as? UILabel
   {
     setRatingLabel(ratingLabel, user: user)
   }
}

I’d love to say I completely understand why it works – I think it’s because ‘case’ statements can fail or succeed. In any case all my code using this works just fine.

While looking a bit odd, the final code is more compact and easier to follow.

Swift 2.0: Catching enums having associated values

Many blogs touch on the ability of Swift to throw an enumeration that contains a payload value, but no one has really shown how to get the associated values – particularly if the different enumeration payloads differ in type.

Here is an example, which shows how to catch those errors and extract the associated value:

enum Foo : ErrorType {
case First(String)
case Second(Int)
}

func flup(i: Int) throws -> Bool {
  if i == 0 {
    throw Foo.First("Howdie")
  }
  if i == 1 {
    throw Foo.Second(2)
  }
  if i == 2 {
    throw Foo.Second(4)
  }
  return true
}

print("Howdie")

do {
  try flup(0)
} catch Foo.First(let error) {
  print("ERROR: \(error)")
} catch {
  print("WTF: \(error)")
}

do {
  try flup(1)
} catch Foo.First(let error) {
  print("ERROR 1: \(error)")
} catch Foo.Second(let error) {
  print("ERROR 2: \(error)")
} catch {
  print("WTF: \(error)")
}

do {
try flup(2)
} catch Foo.First(let error) {
  print("ERROR 1: \(error)")
} catch Foo.Second(let error) {
  print("ERROR 2: \(error)")
} catch {
  print("WTF: \(error)")
}

This is what appears on the console:

Howdie
ERROR: Howdie
ERROR 2: 2
ERROR 2: 4

I finally figured out the Swift 1.2 “if-let” construct

In the old days, pre-Swift-1.2, you have to nest if-let statements

if let foo = who() {
    if let goo = what() {
        ...

This was extended in Swift 1.2, and the best resource for understanding the changes is in the Xcode 6.3 notes (search for “Swift Language Enhancements”).

The usage of this new feature is not immediately obvious – at least not to me. I had a somewhat hard time figuring out how I was going to style these, and in the end I started off with this:

if  let foo = who(), // "if-tab-let"
    let goo = what() // tab then "let"
    ...
{

Then I started adding where clauses:

if  let foo = who() where foo > 1,
    let goo = what() where goo > 2,
    ...
{

Great! That worked. Then I tried adding standalone logic tests

if  let foo = who() where foo > 1,
    let goo = what() where goo > 2,
    counter > 5 // NO GO
{

On a further read of the Xcode release notes, I find that I’m allows one clause logic statement as long as its the first clause:

if  counter > 5,
    let foo = who() where foo > 1,
    let goo = what() where goo > 2
{

A short while ago, I tripped on an NSHipster blog where he deleted all but the first let, and then used a different indention format, which I really liked:

if let // one space between if and let
    foo = who(), // a 4 space tab stop
    goo = what(),
    ...
{

But when I started adding where clauses, the compiler complained:


if let // one space between if and let
    foo = who() where foo > 1,  //  2, // <- PROBLEM
    ...
{

It turns out if you read the notes closely, that the where clause applies to all optional unwrap statements back to the preceding let statement. So if you want multiple where clauses. Ugh. So I can do the formatting using the NSHipster style, but I’ll have to space the additional lets.


if let
    name = name(),
    foo = who() where foo > 1 && !name.isEmpty,
   let goo = what() where goo > 2, // 3 spaces (ugh)
   ...
{

I can even add back my initial logic clause:


if counter > 5,
   let
    name = name(),
    foo = who() where foo > 1 && !name.isEmpty,
   let 
    goo = what() where goo > 2,
...
{

The whole topic of code formatting is a moving target, especially since Apple keeps enhancing the language.

Hope you find this helpful!

Swift Goodies: Using Enums for View/Segment Identification

One technique I used in Objective C to make my code clearer was using enums to map my ‘view with tag’ or ‘segment index’ to something besides a number.

That is, given a table view cell with 4 ‘tagged’ views, instead of writing:

switch (sender.tag) {
case 1:
...

I’d use an anonymous enum:

static enum { 
    NameTextField=1, EnableSwitch
};

switch(sender.tag) {
case NameTextField:
    ...
    break;
case EnableSwitch:
    ...
    break;
//default: // Not needed if you added a case for each enum value
}

In Swift, you can do the same, and even better, your enums can be namespaced (meaning, you can use ‘Email’ in more than one)

private enum Segments: Int {
    case Name = 1, Email
}

@IBAction segmentedAction(sender: UISegmentedControl) {
let selectedSegment = Segments(rawValue: sender.selectedSegmentIndex)!
switch selectedSegment {
case .Name:
    ...
case .Email:
    ...
//default: () // Not needed if you add a case for each enum value
}

When I go back and look at old code, these strings greatly improve the speed at which you can understand what the code is suppose to do.

Swift Goodies: Ideas for Cascading ‘if’ Clauses

Swift 1.2 has brought the ability to cascade let and logic within the scope of one if statement – this is huge and will be widely used. However, what’s missing is some concept of how to style them.

In much of the Apple code, one sees them cascaded on one line, then after 80 characters or so a continuation on the second line:

if let foo = x as? String, a = b(), let c = y as Int where c > blahBlah, more, and more, and more {

with the beginning ‘{‘ brace at the end.

Personally, I find this hard to read, and its hard to visually find the beginning brace on these multi-line statements.

I thought about:

if
    let foo = x as? String,
    let c = y as Int where c > blahBlah,
    more,
    and more
{


which is easy to type - hit the tab key after typing 'if' and then Xcode autoindents the rest for you. This is similar to a style I often used in large 'C' (or Objective C) if statements.

However, there would seem to be reluctance to wasting a whole line with 'if', so what I'm doing is typing 'if' followed by a tab followed by the first clause:

if  let foo = x as? String,
    let c = y as Int where c > blahBlah,
    more,
    and more
{


I'm fairly happy with this, and when I need to convert a single clause if to have multiple clauses, I then add a the tap in front of the first clause, and a new line + backspace in front of the '{' char.

You may not like either of the above styles, but its worth thinking about what style you do like, and then consistently apply it as you write your code.

Swift 1.2 Nullability is Improving My Objective C Code

Swift 1.2 introduced ‘nullability’, a feature whereby you can annotate your Objective C headers and declare method parameters, propterties, and returned objects as ‘possibly nil’ or ‘never nil’ (a third edge case will be undiscussed here).

I support a library that might be used with earlier versions of Swift and/or Xcode, so need to use the annotation in a backward compatible fashion.

What I discovered is that the ‘pragma’s don’t generate any warnings so it would appear you can just add those:

#pragma clang assume_nonnull begin // start of interface
// interface
#pragma clang assume_nonnull end // end of interface

However, the ‘nullable’ and ‘non-nullable’ annotations cause older Xcodes errors, and files won’t compile. The workaround is to use this construct:

#if ! __has_feature(nullability)
#define nullable
#define nonnull
#endif

So the above is one way to deal with the mechanics of using this new feature. But what of the actual feature itself?

When I sat down and looked at my code, I realized that I was often returning nil for an array that could have returned objects, but no objects met the criteria. After all, we all know that ‘[array count]’ return 0 for a nil array and for an actual array with no objects, right?

But really, this is sloppy coding. In one case, I have a protocol method that can return an array of objects and an optional NSError – if success always return an array and no error, and if failure then no array and an error.

This now maps much better into Swift – I can use ‘if let’ to test for an array, if there process as a successful return, and in no array then use ‘!’ on the NSError as it must be there.

I spent an hour or two really thinking about what I was doing in the public facing interfaces, and tweaking them to be more Swift friendly, which also meant they are now more internally consistent and don’t seem so haphazard.